Cathy's Crafting Journey

Welcome to my blog, where I hope you will be inspired and want to share comments and your inspirations and tips too!! I love to create cards, mini albums, gift bags,tags, and boxes and I hope to take you on the papercrafting Journey with me!! Follow along!!

Followers

Sunday, December 30, 2018

New Year Sale A Bration

Hello crafters.. cathy here to share a couple sneak peeks.  The year is coming to an end, and with that I will be saying by to 2018's journeys and will be starting a new one.  I have started the fun process of becoming a Stampin UP demonstrator!!!  I picked my upline...I have set the date I will join and now just waiting for the new year to get here so I can join up under their recruiting special and be able to get some of the new awesome product out of the New Occasions catalog.!  Also, the new Sale A Bration mini starts on the 3rd as well.  I have seen it and love all the fabulous goodies you can get for FREE with purchase of $50.00 before tax and shipping.
  Check out the gorgeous cards  below, made with stamps from the Sale A Bration catalog!!


So just as soon as I get the website up and running, please come shop around because A~ the new stuff is amazing!!! B~ I know you are going to love it and have to have it  and C~  I would love for you to help me get started on my new crafting adventure!!
Love and hugs Cathy

Monday, December 24, 2018

Merry Christmas!

Hello crafters, as the year 2018 comes to an end I am hopeful that the 2019 year will be as fun or more than this year has been.. I have seen many craft trends come and go, and have been involved and new and fun companies that have inspired me to go outside my comfort zone.  But with a new year on the horizon, I am looking forward to a new career in paper crafting, one that involves becoming a demonstrator with Stampin UP.

I am hoping that I will be able to post more regularly and expand my posting to YouTube.  I also hope to be successful in growing a team with Stamp up..

with that said.  I want to wish you all a Merry Christmas and a Happy and prosperous New Year !!
Happy Crafting...Cath

Saturday, December 22, 2018

Stampin UP..here I come!!


12 more days until I sign up to be a demonstrator!! I am so excited to start this new journey. I hope you all will follow me..and consider joining my team we are going to have so much fun!!!!!!!!!!!!!!!!!!!!!!!!!!

be watching!
 Happy Crafting
Cathy

Tuesday, December 18, 2018

makin S'mores

Hello crafters, Cathy here after a short vacation form blogging, sharing a card I created with a KaDoodle Bug Designs file named.. Cutie KaToodles~ Makin' S'Mores.   I have been so busy making crafts for Christmas and doing specials orders, I have not had time to blog.

I am just about ready for Christmas and that is a first for me.  I usually am doing everything at the last minute.... but thanks to the sale of my crafts, I have been able to shop early and get it done!!

Well on to today's card...

I used card stock from Fun Stampers Journey.. and Tim Holtz distress inks for inking the edges of the pieces.   The file is from Ka Doodle Bug Designs..

I hope you will take a moment to check out the files at KaDoodle Bug Designs, there are so many fun ones to choose from.

Thanks for looking and leave a comment before you go, we all love bloggy love

Happy Crafting..Cathy

Friday, November 30, 2018

fishin with friends

Hello crafters, Cathy here to share a card I created this week, which was inspired by a card I saw a while back on Pinterest.  I can not remember where I saw it or would give the creator the due credit.  
I purchased a fish stamp set, cause I thought it was cute, and was waiting for just the right idea to use it with..here is what  evolved...


I love how it turned out. thanks for looking, leave some bloggy love.. and enjoy the rest of your weekend.
Cathy

Christmas gift Hamster

Good afternoon crafter and friends, Cathy here to share a card this beautiful Friday.  As you may or may not know, I recently joined the team of creative girls with KaDoodle Bug Designs, and this weeks Freebie is adorable!!!  Christmas Gift Hamster.  I created the card below using this file. 

I inked the background with Ranger distress inks and used a retired CTMH stamp set and Fun Stampers Journey and CTMH card stock.

Hope you like  today's share..Have a great weekend!
Happy Crafting ~Cathy

Thursday, November 22, 2018

Happy Thanksgiving!!

Good morning and Happy Thanksgiving!!  May you all have a great day, and remember to be thankful for all you have...friends, family, food , shelter, and warmth, because there are so many out there that are not so lucky.
Happy Crafting...Cathy

Tuesday, November 20, 2018

Happy Thanksgiving !!

Hello crafters and friends, I have been super busy lately, so I have been neglecting my blog.   OOPs!  But I wanted to make sure I popped in to wish you all a very happy Thanksgiving.  While I am here I will also share a Card creation..a KaDoodle Bug designs file card.. Cutie KaToodles~Get your pie on!

As I created this card, I did a video/Live tutorial on Facebook.which you can view on my page .
You can find the svg file for this adorable Moose at http://kadoodlebugdesigns.com/shop/

I used Fun Stampers Journey card stock colors
Pumpkin Pie
Lemongrass
whip cream
Tangerine
Pool Play
corrugated card stock
Black licorice ink
and a stamp set of un known name

thanks for stopping by and enjoy your holiday weekend !!
Thanks for stopping by
Cathy
Craft with Cath

Saturday, November 3, 2018

FCC blog challenge #338~ Anniversary


Happy Saturday, hope today finds you happy and healthy.  For me today is a sit in my recliner and relax watching Hallmark movies.  It is so dreary out here in Maine today..raining and blustery. 

Between movies I figured I would pop on to my blog and share an anniversary card I made using my Cricut machine.  I love butterflies and so I cut out 2 different ones and a couple square mats to put the card together.  I used papers from Close To My Heart, and the butterfly is gold glitter paper.  For the corners of the white mat, I used a Martha Stewart corner punch. 

I saw that Fantabulous Cricut Challenge Blog was having a challenge this week, and besides having to use Cricut cuts, you had to theme it Anniversary, so here is my relatively simple card for the challenge.

Thanks for looking, enjoy the rest of your weekend

here is the link for the challenge #... Here
 338~anniversary

Happy Crafting..Cathy

Spellbinders November 2018 Amazing Paper Grace Die of the Month - Christ...

Saturday, October 27, 2018

Christmas inspiration

Happy Saturday everyone, It is beginning to look a lot like Christmas here in Maine, it has been snowing all afternoon.  Kind of pretty.  I als had my first craft fair today.  I brought my cards, and other crafty items to sell.  Was a good day, lots of people and goodies to see. 

Well, today I am writing to share a card with you, a Christmas one, and also enter it in to Crafty Hazelnut's Christmas Challenge.  Anything goes a long as it is Christmas..

My card was made with Fun Stampers Journey Cardstock, ribbon, dies stamps  and inks.

I totally enjoyed putting this card together, I love the colors and the images.  I am getting excited for Christmas..are you??

Here is the link for the Craftyhazelnut's Christmas Challenge
Happy Crafting...Cathy

Monday, October 22, 2018

Coloring cuties

Happy Monday everyone.  Did you all have a good weekend?  I had a great one, relaxed and got to do a little coloring with my Spectrum Noir Blendable colored pencils.  I used some Whimsy stamps as well as cuties from Polka Doodles.

For each card, I used the majority of supplies from Fun Stampers Journey, card stock, ribbon, inks and pattern paper..so these are the cards Icame up with...


So there you have it,the results of a day  coloring.  relaxing and crafting..
thanks for stopping by. leave a little bloggy love on your way out:)
Happy Crafting..Cathy

Sunday, October 21, 2018

Bokeh technique

Happy Sunday folks, hope this morning you are all doing fine.  I woke up this morning with a sinus headache, not feelng real ambitious at first, but guess what?  I cleaned my craft table and glad I did, found some goodies I forgot I had.  Don't you just love when that happens?

Well, todays post I want to share a couple cards I created this week during a card class I hosted.  I shared the Bokeh technique with the girls and they loved it!!

T create this fun design...you start of with regular white cardstock and stamp the base with your stamp of choise, depending on the theme you are going for.  Here you see I did a holiday card and a floral card.

For the holiday card I used Lemongrass FSJ hybrid ink (combo of dye and pigment ink) to stamp a pine needle stamp image, after which I used daubers to ink over the stamped image with 3 other color inks..Watermelon, Haystack and lemongrass.  I randomly added the ink colors and merged them to create other colors. I love how it came out.

Next, I took a piece of cardstock and 3 different sized circle punches, 1/2 imch. 1 inch and 1 and 1/2 inches and punched the 3 different sized holes in the cardstock as a template for inking.  For the next part, I took white pigment ink and placed the circle holes over my stamped image and inked in the holes with the pigment ink.  I went over each image more than one time, cause as they dry, they lighten up.  Some of the circles I intersected and did one whiter than the other to give the impression of depth .  When I was done. it kind of gives the effect of blurred twnkling lights.. I loved it.

The second card was done the exact same way with the exception of using a flower stamp.. I love it.. going to do more of these cards..

I hope you like and will give this technique a try.
Have a great day, leave some bloggy love before you leave, bloggers love comments <3
Happy crafting..Cathy

Friday, October 19, 2018

Winter Snowman


Hello crafters, I can not believe it, but here we are in October and we got snow here in Maine!!  We only got like a duting, but what is funn, is that a few days before we were in the 80's!!  Got to love the seasons in Maine.  I do. we just had a really beautiful fall foliage and it was one of the best I have seen. 
So, any who, I though I would share a couple cards created using an adorable snowman stamp from C.C. Designs called "Winter Snowman", isn't he just adorable??


The Cardstock and papers were from Close to My Heart and Spectrum Noir markers to color this little cutie.  A very simple card to put together and fun to receive.   Hope you enjoyed my cards today and leave a little love on your way out..
Happy Craftin...Cath

Sunday, October 14, 2018

l
Good evening crafters, Cathy here, just popping in to share a couple cards with you.   I had a live video on Facebook showing how to make some cards with a shdaow box on the inside, for got to get pictures of the process before I sold the cards.lol but I did manage one picture.  So I thought I would share what I had,  I really like how they came out..  hope you all had a great weekend,  I know I did.. I spent a good portion of it with my grandchildren.  We had a birthday party and a whole lot of fun..  Have a great night, thanks for looking...Cathy

Wednesday, October 10, 2018

Holiday Flag card


Good evening crafters, Cathy here to share a "flag " card.  While I was cruising through Pinterest, I came across a few images of this style card and decided to give it a try.  I found it was very easy. To start off. you will need one piece of heavy patterned paper measuring 10" long x 6" high, one piece of cardstock measuring 8" long x 6" high, and five 2" squares of cardstock for the flags. Extra patterned paper and embellishments will be needed for decoration once the base is created.   Second step.. Score the piece of cardstock and fold in half to form a 6" x 4" card. Set aside.
Concertina fold the card, starting and ending with valley folds. You should have three peaks in the center of the paper and a 2" flat section on each side.

Apply adhesive on the back of the 2" flat sections on either side of the patterned paper. DO NOT apply any adhesive to the concertina section in the middle.

Line up the adhesive ends of the patterned paper with the sides of the card blank and press firmly in place. The concertina section should be free to fold and unfold as you open and close the card. Set aside.
t's easier to decorate the "flags" at this point rather than after you have secured them to the card. Add some patterned paper, stamps, images and other embellishments as desired. Keep in mind that any decorations you add should be flat as they will be included in the folds of the card.

Apply adhesive to the half of the "flag" that will attach to the card. Double check before you add any glues or tapes to make sure you're applying it to the correct side.
Start by adhering the center "flag" halfway up the middle fold. 
Now adhere two flags on the first fold, one flush with the top of the card, and one flush with the bottom.

 Apply the last two flags on the last fold, one flush with the top of the card and one flush with the bottom.
Decorate the front of the card as desired.  The card is quite bulky when complete, so you might like to create a belly band or ribbon tie to hold it closed.
All but the ribbon are Fun Stampers Journey products.  

 Here is a photo of the inside of the card.

Thanks for stopping by!!
Happy Crafting...Cath

Tuesday, October 9, 2018

Hershey Nugget holder card

Hello crafters..did you all have a great holiday weekend??  I sure did, I went to a wedding for a neice this past weekend that was 2 and 1/2 hours away, so my hubby and I spent the night, as well as a lot of the other family members.  We all had a great time, and let me tell you the ride there and back was awesome. the Maine foliage was GORGEOUS!!!  the colors were definitley at their best. 

After we got back, I got back into full gear getting ready for the future craft fairs.  I made lots of Hershey nugget holders and I am popping in here to share the tutorial with you all.

To start off I chose the papers that that I would creat with.. my score board, paper trimmer FSJ paper tape, liquid tape and scissors..

First off, you need a 6 and 1/2 by 11 and 3/4 inch piece of cardstock for the base...on the 6 and 1/2 inch side, score at 3/4 inches and at 5 and 3/4 inches. Then on the 11 and 3/4 inch side score at  3 and 1/2 inches and 7 inches and 8 and 1/2 inches and 9 and 1/4 inches,  then 10 and 3/4 inches and lastly, 11 and 1/2 inches. in the diagrahm below it shows the scoring as well as where you need to cut..
.
Here is a photo of the scoring

 Here is a photo showing where you need to cut...make sure to use your score tool to burnish your folds...
 The nex step is to create a window to show your chocolate goodies..as you can see I used a die from FSJ called Winter build a Scene..

After I cut out the window, I cut a strip of acetate for the window at 7/8 inch by 5 inches, and I snipt a tiny bit off the end after I glued it on.  I used FSJ journey tape to hold the acetate on..

Here is what it will look like from the outside of the box.
Now it is time to start decorating the card. I used some retired Holiday paper from FunSTampers Journey..it was one of my all time favorite holiday papers, I love Poinsettias. My mats started at 3 and 1/4 inches by 4 and 3/4 and were cut 1/4 smaller for each layer.


 Whe it comes time to close the candy party of the card, I used liquid glue, and did one of the ends first, once it was firly holding, I then used journey paper tape to glue the box to the card part, and used a ruler that I slid inside to enforce the attachment.
Now...fill with the nuggets  and decorate, I used a set of Sopellbinders dies for matting.

 Here is the inside view...

I also had created one for Halloween and thought I would share with you..

I hope you like todays project share and will leave some bloggers Love on your way out.  Have a fabulous day!!
Happy Crafting..Cathy

Tuesday, October 2, 2018

Craft with Cath ~twisted pop up card

Good day crafters.  Cathy back here today to share a pop up twisted card.  I created one live last night on my Facebook page, on what I call Craft with Cath.   Below it is going to be picture heavy, but it should help you in your ability to creat your own ...
First off, the finished card is 4 and 1/4 by 5 and 1/2...
 

For base of card you will need a 4 and 1/4 by 11 inch CS scored at 5 and 1/2
and a same color CS at 2 and 3/4 by 11 scored ar 2 and 1/4, 5 and 1/2 , and 8 and 1/4 , which you will need for the inside pop out part.


then you will need 4 mats of a coordinating CS cut at 2 and 1/2 by 2 and 1/2 as well as 4 of them in white at 2 and 1/4 by 2 and 1/4


Next you need an 8 and 1/2 by 10 and 3/4 in pice of Card Stock for the mechanism on the inside...scored at 5 and 3/8 on the 10 and 3/4 inch side...then turn and score at 2 and 1/4.. next 4 and 1/4 and lastly 6 and 1/4.

above shows the scores, but hard to see.

on the 5 and 3/8 score line, fold in half ..


The insert into paper trimmer, with the fold end first, up to the one inc line and mark the CS with a little tick mark at the very top and very bottom of the paper.. then move the paper to the one and a quarter inch line and mark at 2 and 1/4 and then at 6 and 1/4 inch with a little tick mark.


While the paper is still folded, make a line from the one inch mark to the 2 and 1/4 inch mark and on the other side from one inch mark to the 6 and 1/4 inch mark and then cut out the sections as shown above.
 
when  opened up it should look like the photo above.

   
above is the mats for the front of the card. I cut each one a quarter inch smaller in size.

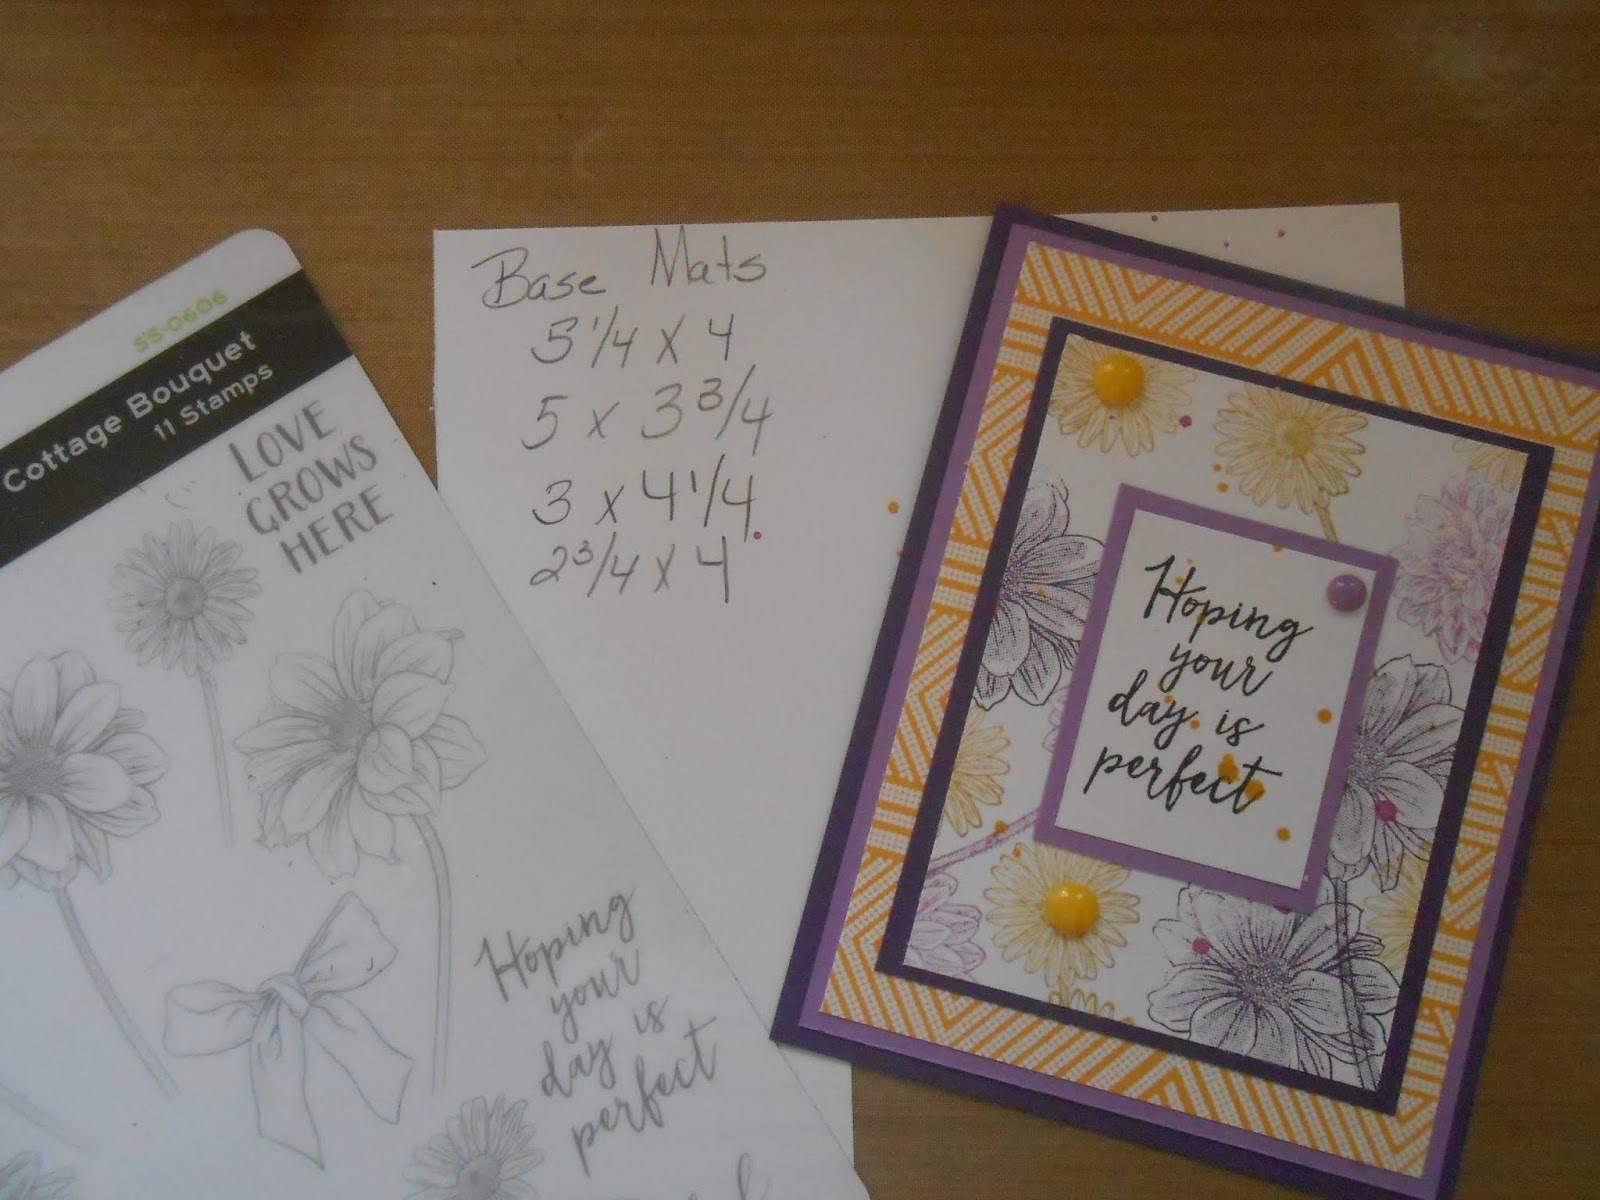
this shows the stamp set I chose and the finished fron of the card.
Next I stamped and assembled all the mats for the inside of the card.


To get the mechanism ready for the long strip with stamped images to be added to the inside, you take the white scored and folded card stock and fold it forward so the score that is going across the center comes down and lines up with the score line that comes down the center..


and then do it to the other side.

to apply the internal stamped images, you add adhesive, liquid or journey tape to the bottom left and the top right "wings " of the white paper. going only about an inch in.


Place the accordian fold. to the fron of the base, making sure the images are not upside down. the flaps should be to the front..then take the wings and pull them together and fold them down and press the flap onto the mechanism.

Do the same to the other side.
Next you glue the center mechanism into your base card..

 And voila..the card is finished.. and I hope you will be able to use these instructions to creat your own.. Thanks for stopping by and us bloggers LOVE comments.so please some love on your way out!

Thanks and have a great day.. Happy Crafting..Cathy