Cathy's Crafting Journey

Welcome to my blog, where I hope you will be inspired and want to share comments and your inspirations and tips too!! I love to create cards, mini albums, gift bags,tags, and boxes and I hope to take you on the papercrafting Journey with me!! Follow along!!

Followers

Tuesday, October 18, 2016

Post it Note easel cards

Fun Calendars!
Hello there KaDoodle Bug fans, Cathy here to share some 2017 Calendars/ note pad holder easel cards...now that is a mouthful.lol..
I spent an afternoon cutting up several KaDoodle Bug Design SVG's and decided to use them to dress up my calendars.. the three files I used were...


Roasting S'Mores Skunks
Cutie KaToodles Building Castles Bear
Sailor Seahorses
all these files can be found here

I also used calendars for Jaded Blossom .
Hope you like these adorable files as muchas I do..Have a great day and make sure to take a peek at KaDoodle Bug Designs shop, her prices are awesome and so are the files.
Cathy

Monday, October 3, 2016

Halloween gift jar with Helmar adhesives

Hello my crafty friends, Cathy here to share with you a Halloween gift jar I made using a mason jar, some tulle, cardstock, and Helmar


To start off, I used my Cricut Explore die cutting machine to cut out a couple of witch boots and used the Helmar Craft Glue to stick pieces together.


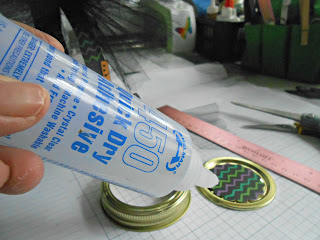
Next, I cut a long strip of black tulle, and wrapped it around the lid of the mason jar using the Helmar 450 Quick dry, as well as cut some short strips and tied in a knot in the middle and glued them on with Fabric Glue..they are the witches tutu.


I have a 2 inch scallop circle punch which I cut a circle out and glued on the top of the mason jar.....


I also cut 2 stips of green glitter paper at 3/4 inches and glued them together with caft glue and wrapped around the top of the jar and tied a stip of spiderweb ribbon to help hold the glitter paper in place.


 And to finish it off, glued a button and added some candy corn....now who to give it to?????
Hope you enjoyed today's project...be sure to check out the awesome adhesives by Helmar.
Have a great day!!


Halloween gift jar with Helmar adhesives

Hello my crafty friends, Cathy here to share with you a Halloween gift jar I made using a mason jar, some tulle, cardstock, and Helmar


To start off, I used my Cricut Explore die cutting machine to cut out a couple of witch boots and used the Helmar Craft Glue to stick pieces together.


Next, I cut a long strip of black tulle, and wrapped it around the lid of the mason jar using the Helmar 450 Quick dry, as well as cut some short strips and tied in a knot in the middle and glued them on with Fabric Glue..they are the witches tutu.


I have a 2 inch scallop circle punch which I cut a circle out and glued on the top of the mason jar.....


I also cut 2 stips of green glitter paper at 3/4 inches and glued them together with caft glue and wrapped around the top of the jar and tied a stip of spiderweb ribbon to help hold the glitter paper in place.


 And to finish it off, glued a button and added some candy corn....now who to give it to?????
Hope you enjoyed today's project...be sure to check out the awesome adhesives by Helmar.
Have a great day!!


Wednesday, September 14, 2016

Witch hat Centerpiece with Helmar

Hello fellow crafters, Cathy here posting today for Helmar and today's project was a super fun one.  I put together for you a Witch hat centerpiece and I used 4 different Helmar adhesives
Helmar 450 Quick Dry adhesive
Helmar Fabric Glue
Foam Glue
and Helmar Fabric Stiffener
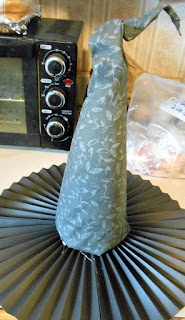
To start off my project, I purchased a styro foam cone 7 inches, a piece of grey patterened fabric and of course I took out my Foam Glue from Helmar.. I cut the fabric out in a triangular shape to wrap around the cone, and adhered it with the Foam glue. love it!! holds fabulously!

Before I totally closed it though I added some fine craft wire, by folding it in half and inserting it into the the top of the cone and bent it in a wavy shape and you will see why in  next picture....


next.. I cut 4 pieces of black card stock at 6 by 12 inches and scored them each at every 1/2 inches and then accordian folded them and added scor-tape to each end because I need to connect each one end on end to create a circular hat rim as you will see....


Next I took one of my smaller bowls and traced out a circle which I then added Helmar Quick dry 450 so when I added the black rosette hat rim it would dry quickly and hold the rim from moving


The next step was to cut a piece of fabric to wrap around the base of the hat and I decided on a bright pink, and I wanted the ribbon to stay up and not slide down abd the ends I wanted stiff, so what better product the Helmars Fabric stiffener and Draping liquid...I of course used gloves to get the ribbon all wet...then I wraooed around and tied in a 1/2 knot


of course, what is a withch hat without some Tulle ribbon???  or a spider web?? I tacked these down with Helmar Fabric Glue


Using my Cricut Design space I got some regular layered flowers as well as some that you roll and then glue on a base and here is a before and after of one I made and glued with 450 Quick Dry...


and here at last is the finished product.... notice the cute little spider??  I have him hanging from some twine...


here are a couple other views


I hope you enjoyed today's project and will visit the Helmar store and check out their awesome products...
thanks for peeking in

Cathy


Thursday, September 8, 2016

CK Baby Crow

Happy Thursday everyone.  Hope you all enjoyed your holiday weekend.  Today I am posting for kaDoodle Bug Designs and I am happy to share a card with you using the file Cutie KaToodles~ Baby Crow.  I decided to make a fall card. because it is right around the corner, although it does not feel it right now. 

You can find this little cutie in the shop HERE

I decided to make a doubleZ card, they are super easy and fun.  I collected a bunch of coordinating scrap pages and  cut out the October from Cricut Design space and used the adorable baby crow..isn't he CUTE!!!


I hope you like the card and want to thank you for peeking in. Have a great week, Make sure to stop in the shop and see all the wonderful filea Melissa has made for you
til next time... Cathy

Friday, August 26, 2016

National Dog Day with Helmar

Happy Friday to you all and Happy National Dog Day.  Today I am posting for Helmar, and also celebrating National Dog Day.  In doing so I want to do a project memorializing our golden retriever of 11 years..Shelby (fondly called Shelbyroo) who passed away June 7th of Cancer.
What I decided to do was redo an 8by8 shadowbox picture frame, which previously had Christmas decor inside.

I started by ripping off the old decor and paper.
The next thing I did was get one of her older license tags and repainted it to match my project colors, and set it aside to dry.

Next I found the picture of Shelby I was going to use and matted it with a cut I got from my Cricut machine. I used Helmar Acid Free Glue so as not to ruin the photo.
next I finished matting
I used the Helmar Super Tack Glue to add the cardstock to the chipboard frame.


I created a banner for the background and used the Helmar Permanent adhesive runner.

I made some 3 dimensional paper daisies. I cut them with my Cricut machine, spritzed with water and molded with the different sized styluses.  I joined 3 in layers and added a button for the centers. For adhesive for the flowers and the dog dish image I used Helmars'  450 Quick dry adhesive.


I made a couple bows with silver ribbon, added some fancy buttons on top and glued on outside of frame with 450 Quick Dry adhesive...


Finally assenbled all the pieces and took the finish frame outside by what used to be her yard and took a picture.

Sure do miss her. she was a wonderful do and member of the family.
thanks for peeking in.you can get any or all of the fabulous Helmar products I used by clicking on the name below


have a great day....Cathy