Cathy's Crafting Journey

Welcome to my blog, where I hope you will be inspired and want to share comments and your inspirations and tips too!! I love to create cards, mini albums, gift bags,tags, and boxes and I hope to take you on the papercrafting Journey with me!! Follow along!!

Followers

Showing posts with label Bo Bunny. Show all posts

Tuesday, March 15, 2016

Springtime digital

Hello crafty friends, I hope you are all.doing well.  Today I am posting a card using a digital stamp from Stamprints. 
I totally enjoyed coloring this image I think it is sooo pretty.


I used Close to my Heart Cardstock and Bo Bunny 1/2 back pearls, the stamp and ink are also from Close To My Heart.  The pretty ribbon is from Really Reasonable ribbon.  The digital image was colored with Spectrum Noir Markers. I hope you like the card and image and will check out Stamprints


you can also visit her blog here
Cathy
Have a great day!!
leave a little love after the beep
Beeeeeeeeeeeep

Thursday, February 26, 2015

Bi Weekly Challenge 8- Anything Goes

Cuttin' & Stampin'  challenge..:Anything Goes"
Welcome friends to another crafty post.
Today's Cuttin' & Stampin' chalennge projects are an assortment of 4 cards with supples listed below which can be purchased at the  Cyttin' & Stampin' Scrappy syupply store


Avery Elle "Simply Said" stamp set


Bo Bunny Altitude 6x6 paper pack
SUNBURST CARDS

I made a  Happy for you card....


A Happy Engagement card...


and a Happy Anniversary card..


 I think the set would make a nice set for a little gift pack for someone special.  I love the assortment of colors in the paper pack, such a lovely combo.
Now I think it is time for you to click on the link be low and add your  Anything Goes project on the Cuttin' & Stampin' Challenge Blog!!
 thanks for stopping in.  Have a great day

Cathy


Saturday, January 3, 2015

Merry & Bright


Merry and bright snowman tag card..look what I got....
Happy Saturday, although Saturday is almost over with here.   I was crafting and noticed I had a single Christmas tag left over from  the holidays.  It was made using my Spectrum Noir Markers and a New stamp from Unity stamps~~ Roly Poly winter Joy.  I also used ribbon from The Really Reasonable Ribbon Co. and the card stock was from Bo Bunny Candy cane Lane. So I decided to make a card with it and maybe enter a few challenges...so here it is..


I am entering this in 
Really Reasonable Ribbons challenge..Look What I got with ribbon or trim
Thanks for stopping by 
Please come back again
Cathy

Monday, December 15, 2014

Atlantic Hearts Sketch Challenge #86


Good morning, how was your weekend?  I had a wonderful one.  Sunday my husband's side of the family got together for Meatpies and gift swap and games.  we all had a great time.
I have not posted or checked around blogger lately been real busy making crafts for gifts and to sell,  Things should quiet down soon.
So anyways, today i am posting for challenge number 86..and here is my card...


It is a 5 and 1/2 by 5 1/2 card made with ...
Coordinations CS
Really Reasonable Ribbon
Spectrum Noir markers
Snowflake embellishment
CTMH Stamp
CTMH Ruby ink
and designer CS from Bo BUnny Candy Cane Lane
normally I like to use CTMH papers, But I used up all my CTMH Christmas papers this week.
Hope you like my card.  please leave a comment and  head over to the Atlantic Heart Sketch challenge and link up your creation here
Reminder...
 Close to My Heart
December stamp of the month

Happy crafting....Cathy


Tuesday, April 29, 2014

14-17 Apr 29: Cuttin' & Stampin' Challenge


Hello and happy Tuesday to you..today is Cuttin' & Stampin' s  Tuesday Challenge..14-17  Apr 29: Mother's Day without flowers, Using...Bo Bunny Modern Miss and PS Scripty Saysing Stamp Set.
For todays' challenge I decided to make a triple easel card.. I really had fun making it, had not made one in a while, just like getting back onto a bike lol.


Full front view

View of center part of card , wnated you to see the adorable Brad with the glasses


Here is the front of the center card..I attached one of the cute stickers onto a pop dot and Scalloped piece of the card stock


Below is the left side of the easel using the Bo Bunny Paper, Stickers , and the tickets and another cute brad


And last but not least ..the right side, Love the stickers


here are some of the products used


 If you would like to get your hands on these Bo Bunny products or Paper smooches stamps.. head over to the  Cuttin' & Stampin' Scrappy Supply Store here.. thanks for stopping by and checking in, please come back again. Make sure you also leave some love for the other ladies by heading over to the Cuttin' & Stampin' Challenge blog and make sure you link up a creation of your own!!


Cathy


Saturday, August 24, 2013

WEDDING BELLS ARE RINGING!


Fall wedding bells...

Good evening everyone,did you all have a good day,  I did, I made cards alllllll day. I made a wide variety too. The 3  that I am going to show you are for special orders from friends.  A couple of the weddings are in the fall so, hence fall leaves are used, which by the way were saved from my son and daughter in laws wedding last fall:)  Recycling!


The first card I used the Cricut Wrap it Up cartridge, papers from my stash, ribbon I won from Creative scrappers, Bo Bunny gems, Atg gun and zig pen.


Second card is from Wrap it up too.  Some of the supplies I got from Kinderstampo's shop, the wood die cut was from Recollections, the stamp and bling come from Close To My Heart. as well as the ink. the flowers  are from my stash, and I used Stickles for the veil.


And the last one Also was made using the  Cricut Wrap It Up cartridge.  I had also found a 6x6 pad of DCWV Burlap paper in the clearance bin, bought it and love it.  I cut a strip to put across the center of the card, and then added some lace from the Really Reasonable Ribbon assortment I just got.. Love their ribbon!!  The paper pad is the Bo Bunny Apple cider collection.
Well I hope you liked the cards I had to share tonight.  Please come back:)

P.S. if there is anything you need from Close To My Heart, I am your girl.  click on the Shop with me and get your copy of the Artbooking collection, remember this month you get the August Stamp of the Month FREE!!!

http:..cathyplus5.ctmh,com


Thanks for stoppin By,,Happy Crafting~~ Cathy

Saturday, November 3, 2012

MCCR November 100 Cartridge Blog Hop

 
Good morning crafters, and welcome to.. 
 November's My Cricut Craft Rooms 100 Cartridge Blog Hop, day 2.  Glad you are here.  This months theme is Christmas.  I realise we have not had thanksgiving yet, but we want to give you ideas and inspiration for your holiday card making and decorations and gifts.  There is nothing nicer and more cherished than Home made.     So here we go........
 
Card #1
 
 
The first of the cartridges I used was the  Winter Frolic cardtridge, which has some wonderful features and images,  There is something in there for everyone.  My card is a 8 1/2 by 11 cardstock folded in half, on which I used papers from DCWV's Seasonal stack.  I made 4 mats, each 1/4 inch shorter than the other.  And then on them I used 2 mats 3 1/2 by 4 1/2 and cut 2 pieces of patterend paper 1/4 in smaller.   On one mat I put a strings of  colored Rhinestones and a picece of colonial white cardstock that I used a friends' Martha Stewart "Gift" border punch, did not get the name but going to research it and put it on my Christmas list. hehehe.
 
 
On the second mat, I cut out a Gift giving mouse from Winter Frolic with Recollections card stock and papers from DCWV and Bo Bunny.  The mouse was at 3.5 inches.  On the inside I used the phrase "For You" .
 
                                                                                            ~~~
                                                                                          Card #2

 
 This card was made with the Paisleycartridge, It is 5 and 1/2 by 8 and 1/2.  There is a 3 and 1/2 inch wide band that I made to go around the card to keep it closed. and decorated it with beautiful roses from the Artiste cartridge. and added some brown and rose colored leaves, as well as 2 ornaments i cut from Artiste as a tie in to go with the patterned paper from DCWV Christmas and Winter Stack.  At the top of both fold are swirls of pink rhinestones I got at walmart in the Clearance bin.


On the inside I cut out a cute monkey from Paisley with a sucker.  he is such a cutie.lol  "happy Holidays comes from the Winter Frolic cartridge.  On the 2 side flaps I put some Christmas trees from WF as well.
 
 
I just LOVE the roses from Artiste and Art Philosophy!!
 
 ~~
Card #3


 This card I made with Echo park papers from last year.  The cartridge is 3 Birds on Parade. This is another versatile cartridge.  I love it.  The santa bird that I cut from the 3 Birds cartridge is sitting on an action wobble. I had recorded a small video to show you how he dances, but could  not get it to load, sorry.  I hade some scalloped square mats to put him on that was embossed as well with Holly leaves.

 
I tried to take a close up picture of the round glass balls that matched the papers,  a little blurry, I love them!  They are Crystal candy Dots from Pebbles INC.  On the inside I used the sentiment from the 3 Birds on Parade cartridge.


Card #4 
 
This is a "telescoping card".  The bird is from 3 Birds on Parade, and all the rest of the cuts are from the Artiste cartridge.  Papers used were a combination of Close To My Heart and Recollections.  Th cold little biry was cut at 3 inches. I used a little Stickles on  his pom pom and the liner of his boots.   The mittens on the middle section were cut at 2 inches with a shadow.  I used trendy twine to tie them together.  Then added a little Bling:) I used several different shapes on each layer to make it easy to distinguish the layers.

 
The different cuts that were used were on pages 79, 35 and 31 of the Artiste booklet.
 

This is what the card looks like fully opened.  On the last layer I added the sentiment...Baby it's cold outside..i like how it turned out. if you would like to try this typ of card and have nevertried it here is a link to a tutorial. http://www.splitcoaststampers.com/resources/tutorials/telescopingcard/


Other supplies  used in making the cards, Expression2, Fiskars trimmer, paper piercer, gel pens, atg gun, dimensionals, brads, Tim Holts distress inks,  Zig pen Liquid glass and fabritac. 

Hope you enjoyed my projects today and they inspired you to try something new.
 
 
Thank you for hopping along with us, your next stop is
 

Sunday
  1. MCCR http://mycricutcraftroom.blogspot.com
    2. Claire http://threewaterscreations.blogspot.com
    3. Cathy  http://cathyplus5.blogspot.com
    4.  Erica’s Projects http://ericasprojects.blogspot.com
    5.  Jodi http://jodiesscraplab.blogspot.com
    6.  Jamie M http://craftygirl21.blogspot.com
    7.  Erica’s Blog Candy http://ericasblogcandy.blogspot.com

Thursday, November 1, 2012

Scrapbook Friday at MCCR

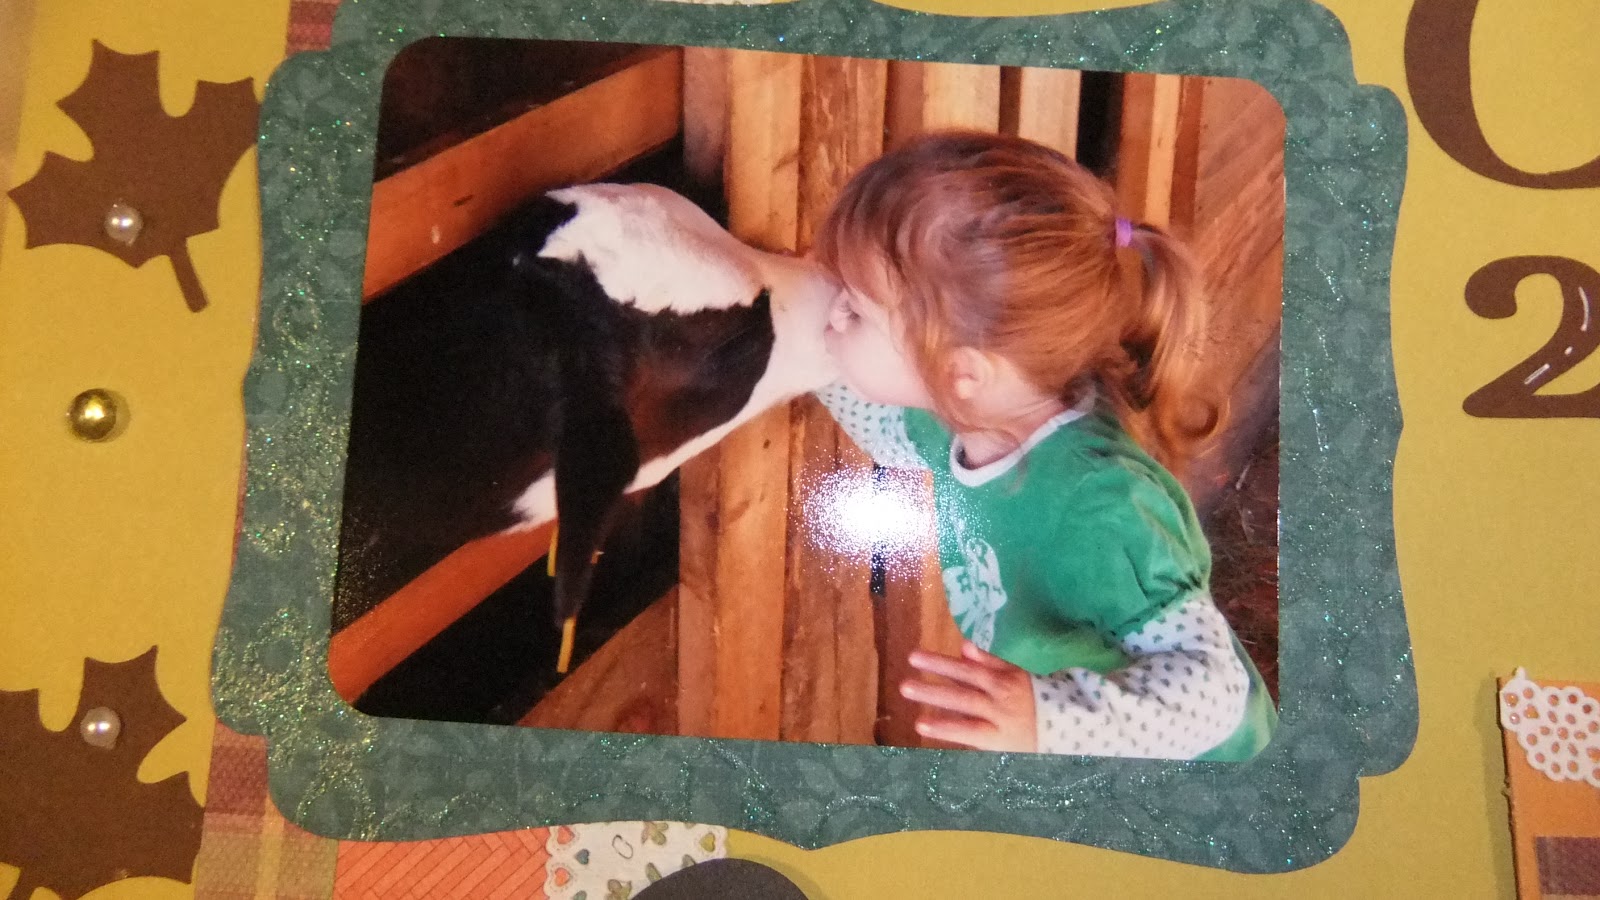
Welcome to my design team post for My Cricut Craft Room Scrapbook Friday project.  This weeks post is a scrapbook page focusing on Fall. What I decided to do was use a picture I just got of my beautiful 2 year old grand daughter Isabella Maye who recently went to Pumpkin Land here in Maine. This is a place that is known for having a lot of fun things to do and see, for people of all ages.  A lot of people look forwar to it opening in the fall.  There is a big corn field Maze, rides, a bunny farm, a barn with cows and pigs, goats and ponies for rides.  Games and rides and lots of fun things to do.


She is like me and LOVES animals as you can see.lol.   She kisses them all!
 
I used my Art Philosphy cartridge to make the mat under the picture, a well as the leaves down the side, the fonts and the hearts and tag.
 
 
For the tag, I created a pocket for it to go in and added some paper lace that a Scrappin friend gave to me.  On the tag and the font below I added a pumpkin I cut from the Happy Hauntings cartridge.


After I put the page together, I went around the page and added some hilites with a white and black gel pen, and added pearls from Bo Bunny. I put pop dots under the hearts just to add a little dimension.  Papers used were from Close to My Heart, and some papers I purchased from Erica, and can not remember who the company was. Of course I used my Cricut Expression 2 and my fiskar paper trimmer, and atg gun and zig pen.  That is my project for today, so to see more projects be sure to go to http://mycricutcraftroom.blogspot.com
 
Have a great day and happy crafting....Cathy

Sunday, October 7, 2012

MCCR Letter "O" post


Welcome to my blog, this is my, My Cricut Craft Room Design team post.  Today's theme is a project from a cartridge starting with the letter "O" or a character starting with the letter "O".  And so before I show you what I chose to do, I want to briefly explain the Pink Graphics.   We want to bring awareness to  breast cancer and the people that have, are, or will be suffering from it.  Please make sure you keep your regular womens health check up, early detection is the key.  Our part in the months awareness is to incorporate some how in our projects a lot or just a little Pink.


For my letter "O" project I used the Cricut Essentials, which is programmed into my Expression 2 machine to cut the orange,(which is not actually an orange on the cartridge, but I made it work, it looks like one).  I cut is at 2 1/2 inches, and inked it up with Spiced Marmalade by Tim Holtz.  I saved the little triangle ections that came from the inner orange and faux stitched them and added Bo Bunny gems, to embellish:)  I then placed a letter you chipboard piece below the orange and added the word sweet cut form the Sweet Treats cartridge.  I cut it out twice, once in orange and again in Pink.  Voila... ORNAGE U SWEET. 
 
On the inside of the card I cut a piece of white card stock and added a pice of the card stock I was using and a Petaloo flower. Using a Stampin up stamp, I added the "Thanks".  Other supplies used, zig pen, atg gun and pop dots and black micro pen.


                    The patterned card stock was from the Echo Park Hello Summer card pack.
Well, I hope you liked todays project, to see more fun projects and amazing talent head over to Ericas' at  http://mycricutcraftroom.blogspot.com

                                               thanks for stopping in, Cathy